This section is used to manage your contact list within the application.
On the left side of the screen, you'll see the menu. The currently selected tab is "Contacts", indicated by a person icon and an address book icon.
Above the contact list, there's a "Shared for" dropdown menu. This allows you to filter contacts based on their visibility settings (e.g., showing contacts shared with specific users or groups).
Below this, you'll find the contact list. Each entry displays the contact's initials (e.g., AP), their name, phone number, and visibility status (e.g., "PUBLIC", "PRIVATE").
Additional Information: If the Pipedrive integration is enabled, contacts imported from Pipedrive will also appear in the "Contacts" list. These will be displayed alongside manually added contacts and assigned to a dedicated Pipedrive group.
In the top right corner of the screen, you'll find a "CREATE NEW" button, which allows you to add a new contact.

Clicking the "CREATE NEW" button will open the "New Contact" form.
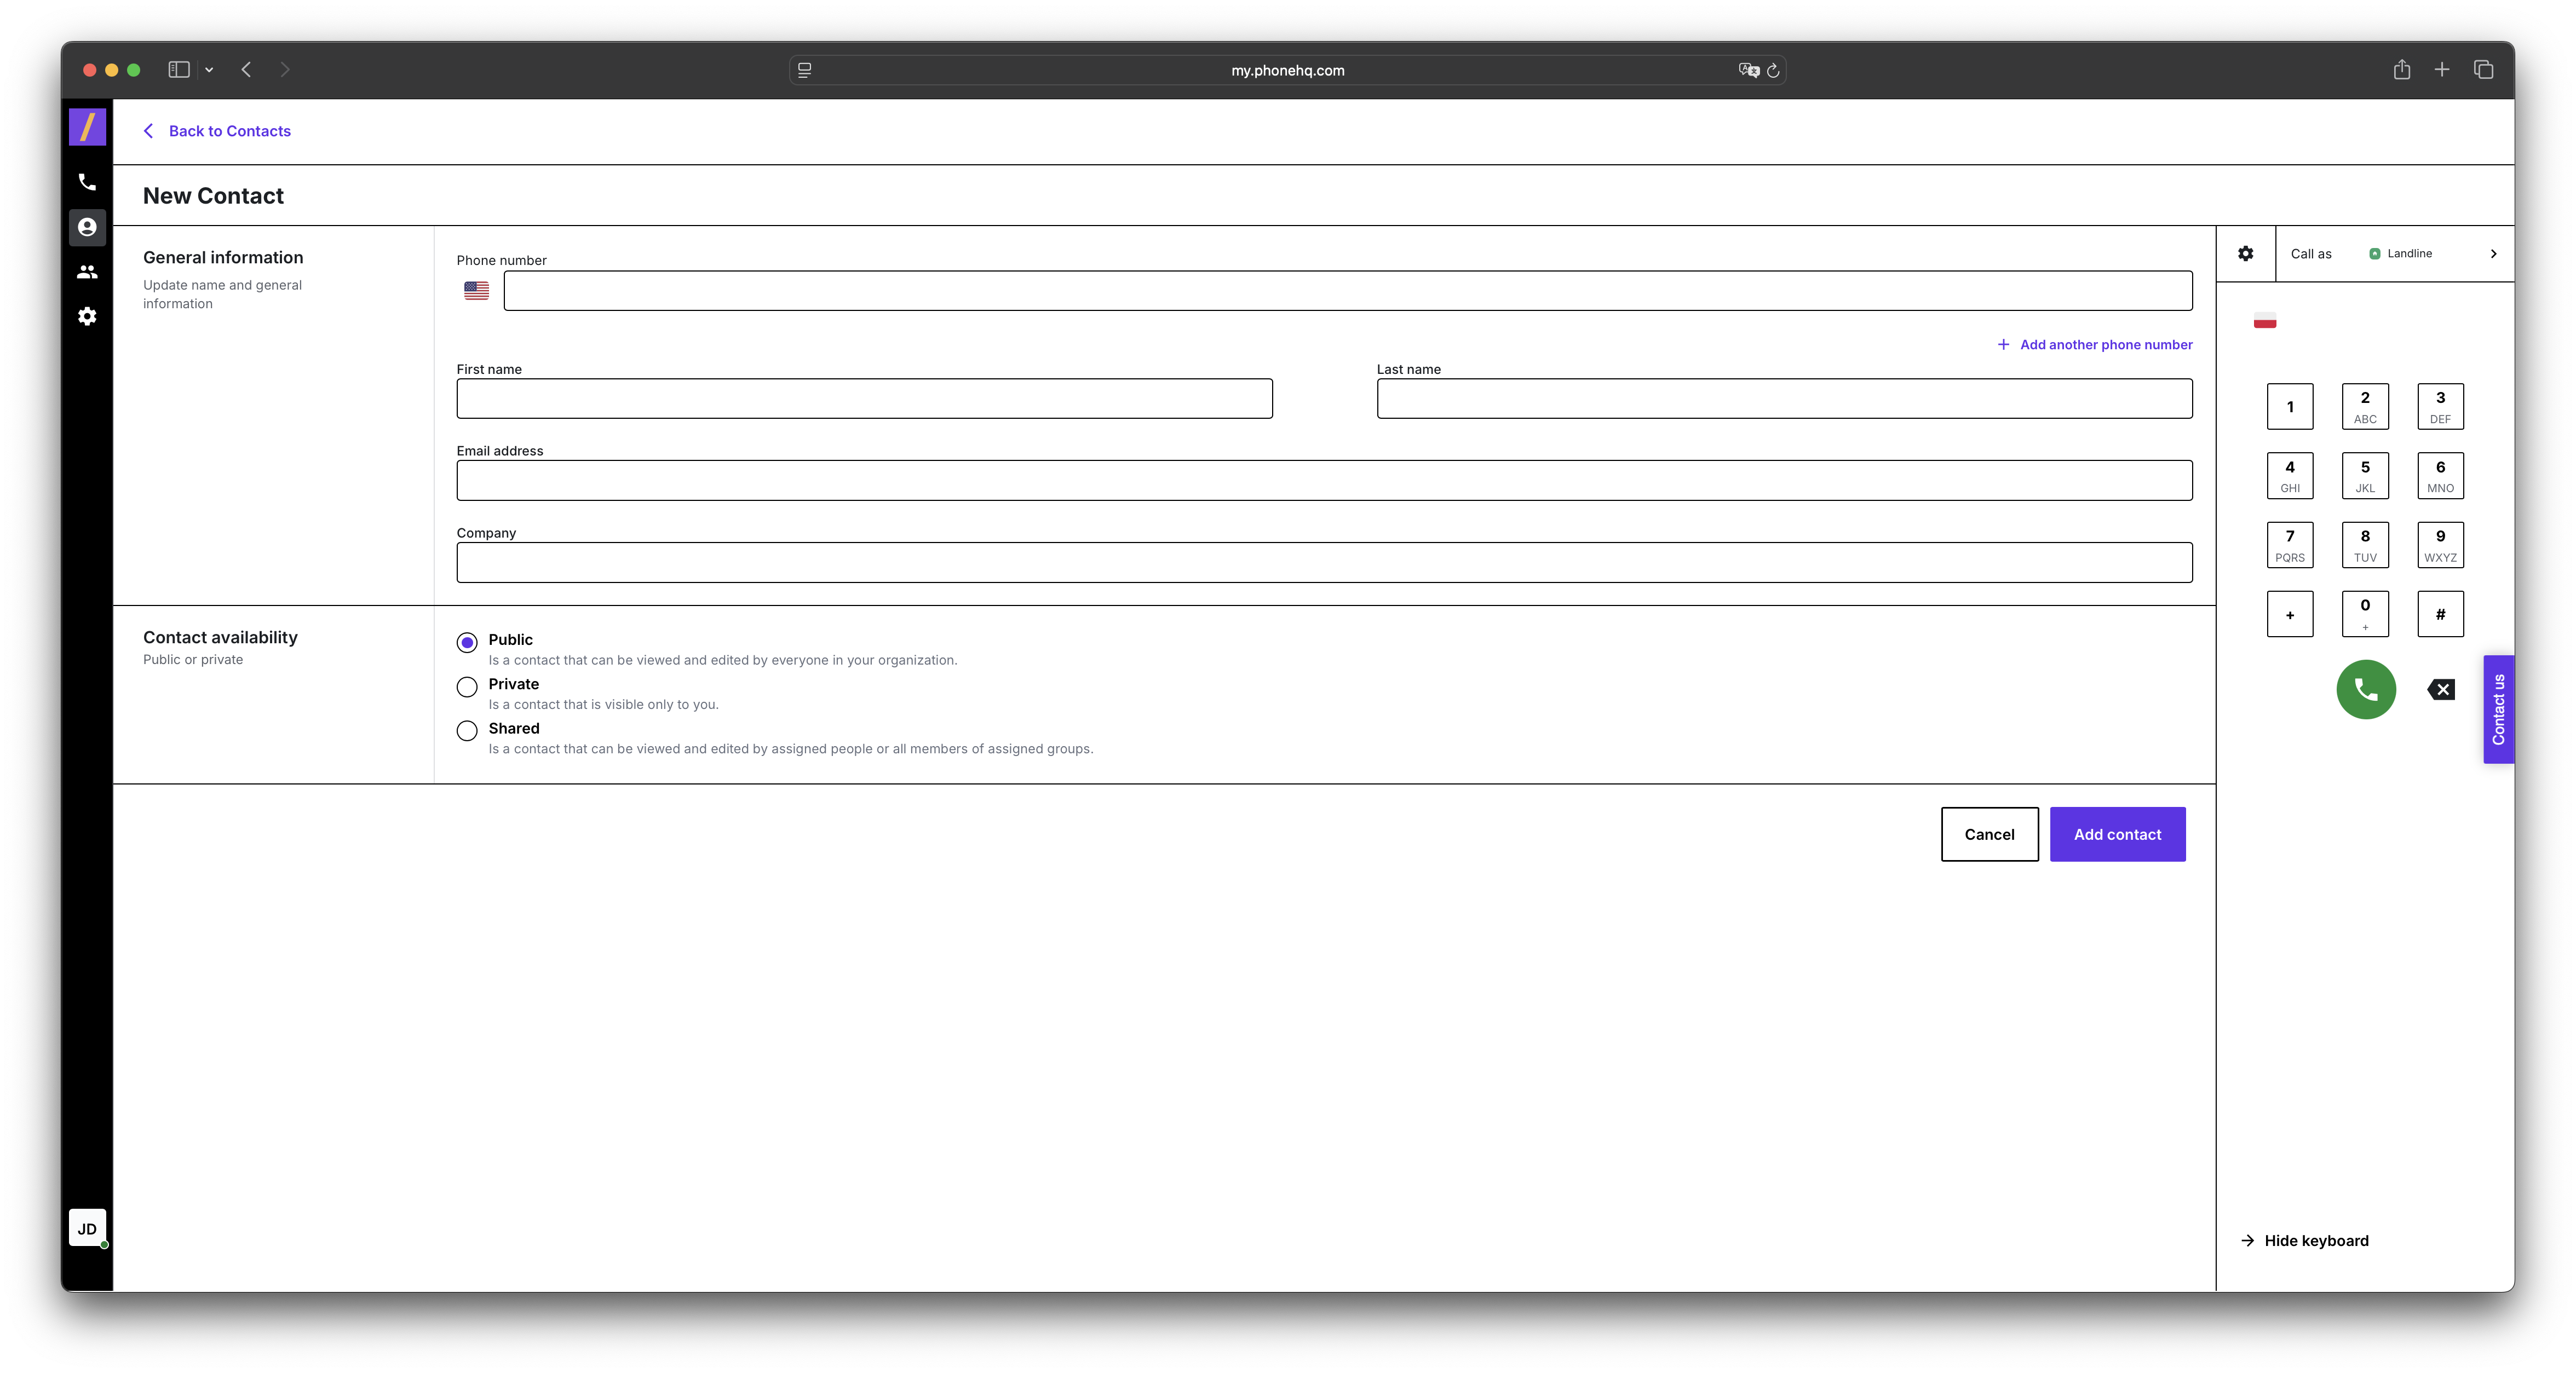
General Information Section:
This section contains fields to enter the contact's basic details:
First name
Last name
Email address
Company - this field is optional.
Phone number Section:
By default, one phone number field is displayed along with a country flag selector (e.g., USA). You can add more phone number fields by clicking the "+ Add another phone number" button.
Contact availability Section:
This allows you to set the visibility of the contact you're creating:
Public: The contact will be visible and editable by all users in the organization.
Private: The contact will only be visible to you, the creator.
Shared: The contact will be visible and editable by specific people or groups you select. Additional sharing settings will appear when this option is chosen.
At the bottom of the form, you'll find two buttons:
Cancel: Clicking this will close the form without saving any changes.
Add contact: Clicking this will save the new contact and add it to the list.
After successfully saving a new contact, it will appear in the "Contacts" list.
Each contact in the list displays their name, phone number, and visibility status (e.g., "PUBLIC").
Pipedrive Contacts: If the Pipedrive integration is active, imported contacts from that system will also be visible in this list. They will be labeled according to their visibility settings in Pipedrive.
Go to the "Contacts" tab: In the left-hand menu, click the address book icon ("Contacts").
Start adding a contact: Click the "CREATE NEW" button located in the top right corner of the screen.
Fill out the "New Contact" form:
In the "General Information" section, enter the first name (First name), last name (Last name), email address (Email address), and company name (Company - optional).
In the "Phone number" section, enter the phone number. To add another number, click "+ Add another phone number".
In the "Contact availability" section, choose the desired visibility for the contact:
Public: To make the contact visible to everyone in the organization.
Private: To make the contact visible only to you.
Shared: To share the contact with specific people or groups (configure who you want to share with after selecting this option).
Save the contact: Click the "Add contact" button at the bottom of the form to save the new contact. If you want to cancel, click "Cancel".
Check the contact list: The newly added contact should appear in the "Contacts" list, displaying its name, phone number, and the visibility status you set. If the Pipedrive integration is active, you will also see imported Pipedrive contacts in this same list.
Public:
The contact is visible and editable by all users within your organization.
This is useful in situations where multiple team members need access to shared contacts, such as clients or business partners.
Private:
The contact is visible and accessible only to the user who created it.
No one else in the organization can view or edit it. This is ideal for storing personal numbers or contacts that shouldn't be shared with the team.
Shared (additional option):
The contact is visible and editable only by specific individuals or groups that you choose.
This provides more granular control over contact access, for example, allowing you to share contacts only with members of a specific department.
Contact Management:
Create new contacts.
Edit existing contact information.
Delete unnecessary contacts.
Store key information such as first name, last name, email address, phone number, and company.
Pipedrive Integration:
Automatically import contacts from Pipedrive (when the integration is enabled).
Display Pipedrive contacts in the same list as manually added contacts, centralizing CRM data within the phone application.
Visibility Control:
Set the visibility level for each contact (Public, Private, Shared).
Manage access to both manually added and Pipedrive-imported contacts, which is crucial for teamwork and data privacy.
Filtering and Searching:
Filter the contact list using the "Shared for" option to display only contacts shared with specific people or groups.
Search for contacts by name or phone number using the magnifying glass icon, including contacts imported from Pipedrive.
Integration with Calls:
Use contacts (including those from Pipedrive) when making calls in the "Calls" tab.
View the call history with a specific contact in the "Calls" tab.
How do I add a new contact?
Go to the Contacts tab and click the "CREATE NEW" button in the top right corner. Fill in the form and click "Add contact".
What visibility options can I set for a contact?
Public – visible and editable by everyone in the organization.
Private – visible only to you.
Shared – visible/editable only to selected users or groups.
Can I import contacts from external tools?
Yes, if the Pipedrive integration is enabled, your Pipedrive contacts will appear alongside manually added contacts.
What is the "Shared for" dropdown used for?
It filters the contact list to show only contacts shared with specific users or groups.
Can I store multiple phone numbers for a single contact?
Yes. In the contact creation form, click "+ Add another phone number" to add additional numbers.
What happens if I click "Cancel" while adding a contact?
The form will close, and no information will be saved.
How do I edit or delete a contact?
Locate the contact in the list, then use the available options (typically via a menu or edit icon) to modify or remove it.
What does each contact entry display?
Each contact shows:
Initials (e.g., AP),
Full name,
Phone number,
Visibility status (e.g., PUBLIC, PRIVATE).
How are Pipedrive contacts labeled?
They are labeled with the visibility setting applied in Pipedrive and grouped accordingly in the contact list.
Can I use these contacts in the Calls tab?
Yes. Your contacts (including Pipedrive ones) can be used when making or receiving calls, and call history can be linked to them.
Term | Definition |
Contacts Tab | A section where users can create, manage, and view contact information, including integration with other tools like Pipedrive. |
CREATE NEW | A button in the top-right corner used to add new contacts. |
Shared for Dropdown | A filter option that displays only the contacts shared with particular users or groups. |
Public Contact | A contact visible and editable by all organization members. |
Private Contact | A contact visible only to the user who created it. |
Shared Contact | A contact accessible to selected individuals or teams. |
Contact List | The main panel that shows all contacts, including name, number, initials, and visibility. |
Pipedrive Integration | A CRM integration that automatically imports Pipedrive contacts into the app. |
Initials (e.g., AP) | A visual identifier created from the first letters of a contact’s first and last name. |
Phone Number Field | The input area for adding a contact's number. More can be added if needed. |
Company Field | An optional field where the user can assign a contact to a company. |
Visibility Settings | Rules that define who can see and modify a contact (Public, Private, Shared). |
Cancel Button | A control to exit the new contact form without saving. |
Add Contact Button | A control to save and add the newly created contact to the system. |
Found a mistake or missing article? Contact PhoneHQ Support and let us know!
